1 概述
《Spring实战第四版》描述了Spring4架构的设计,看完了以后,最大感觉是Spring的IOC与aop理念实在是太强大了,而且用注解来简化系统配置的想法也非常棒,整个架构简直就是MVC的典范
2 Spring之旅
2.1 Intellij IDEA
下载Intellij的15版本,然后将授权地址填写为http://idea.iteblog.com/key.php
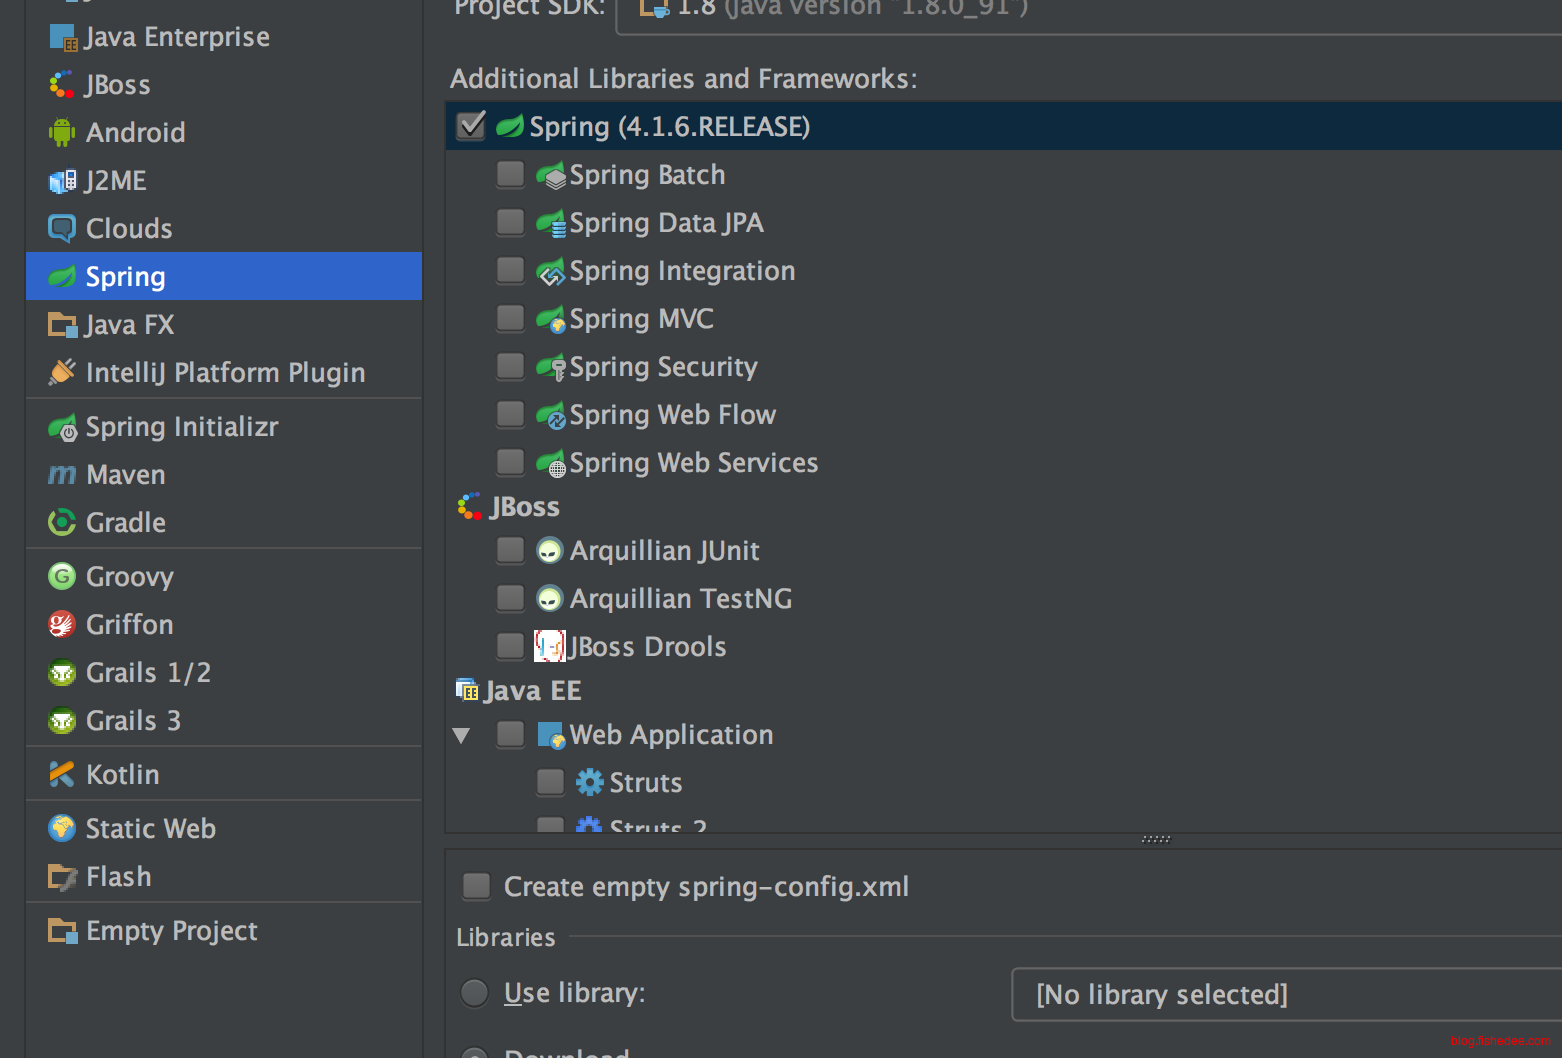
建立一个Spring项目
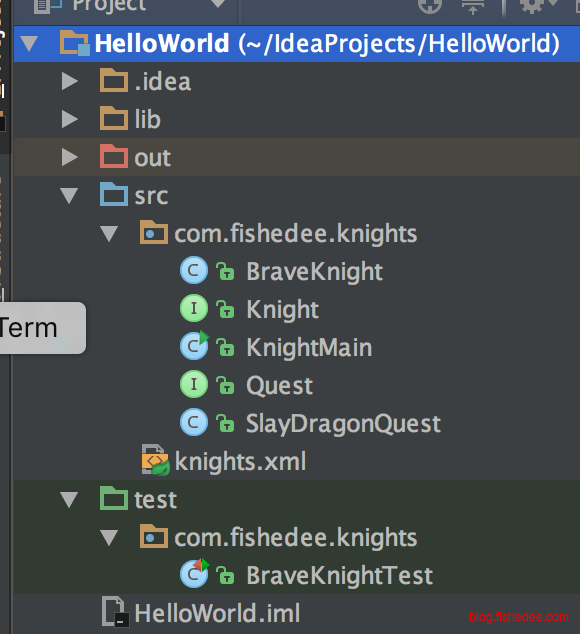
按图建立对应的文件
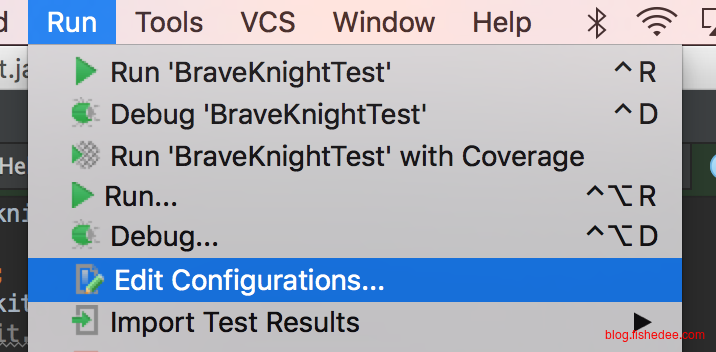
配置启动参数
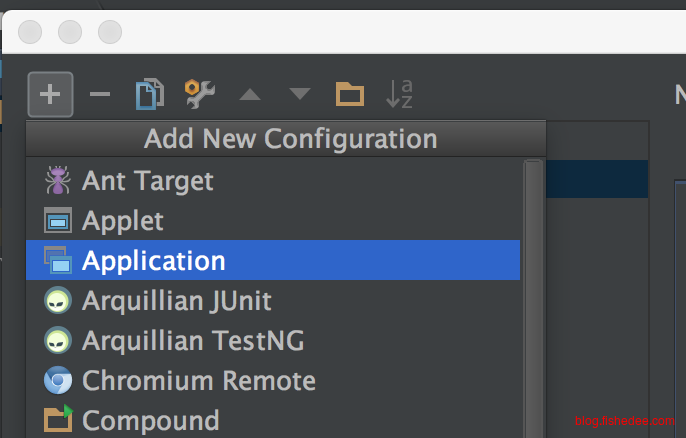
建立Application的启动项
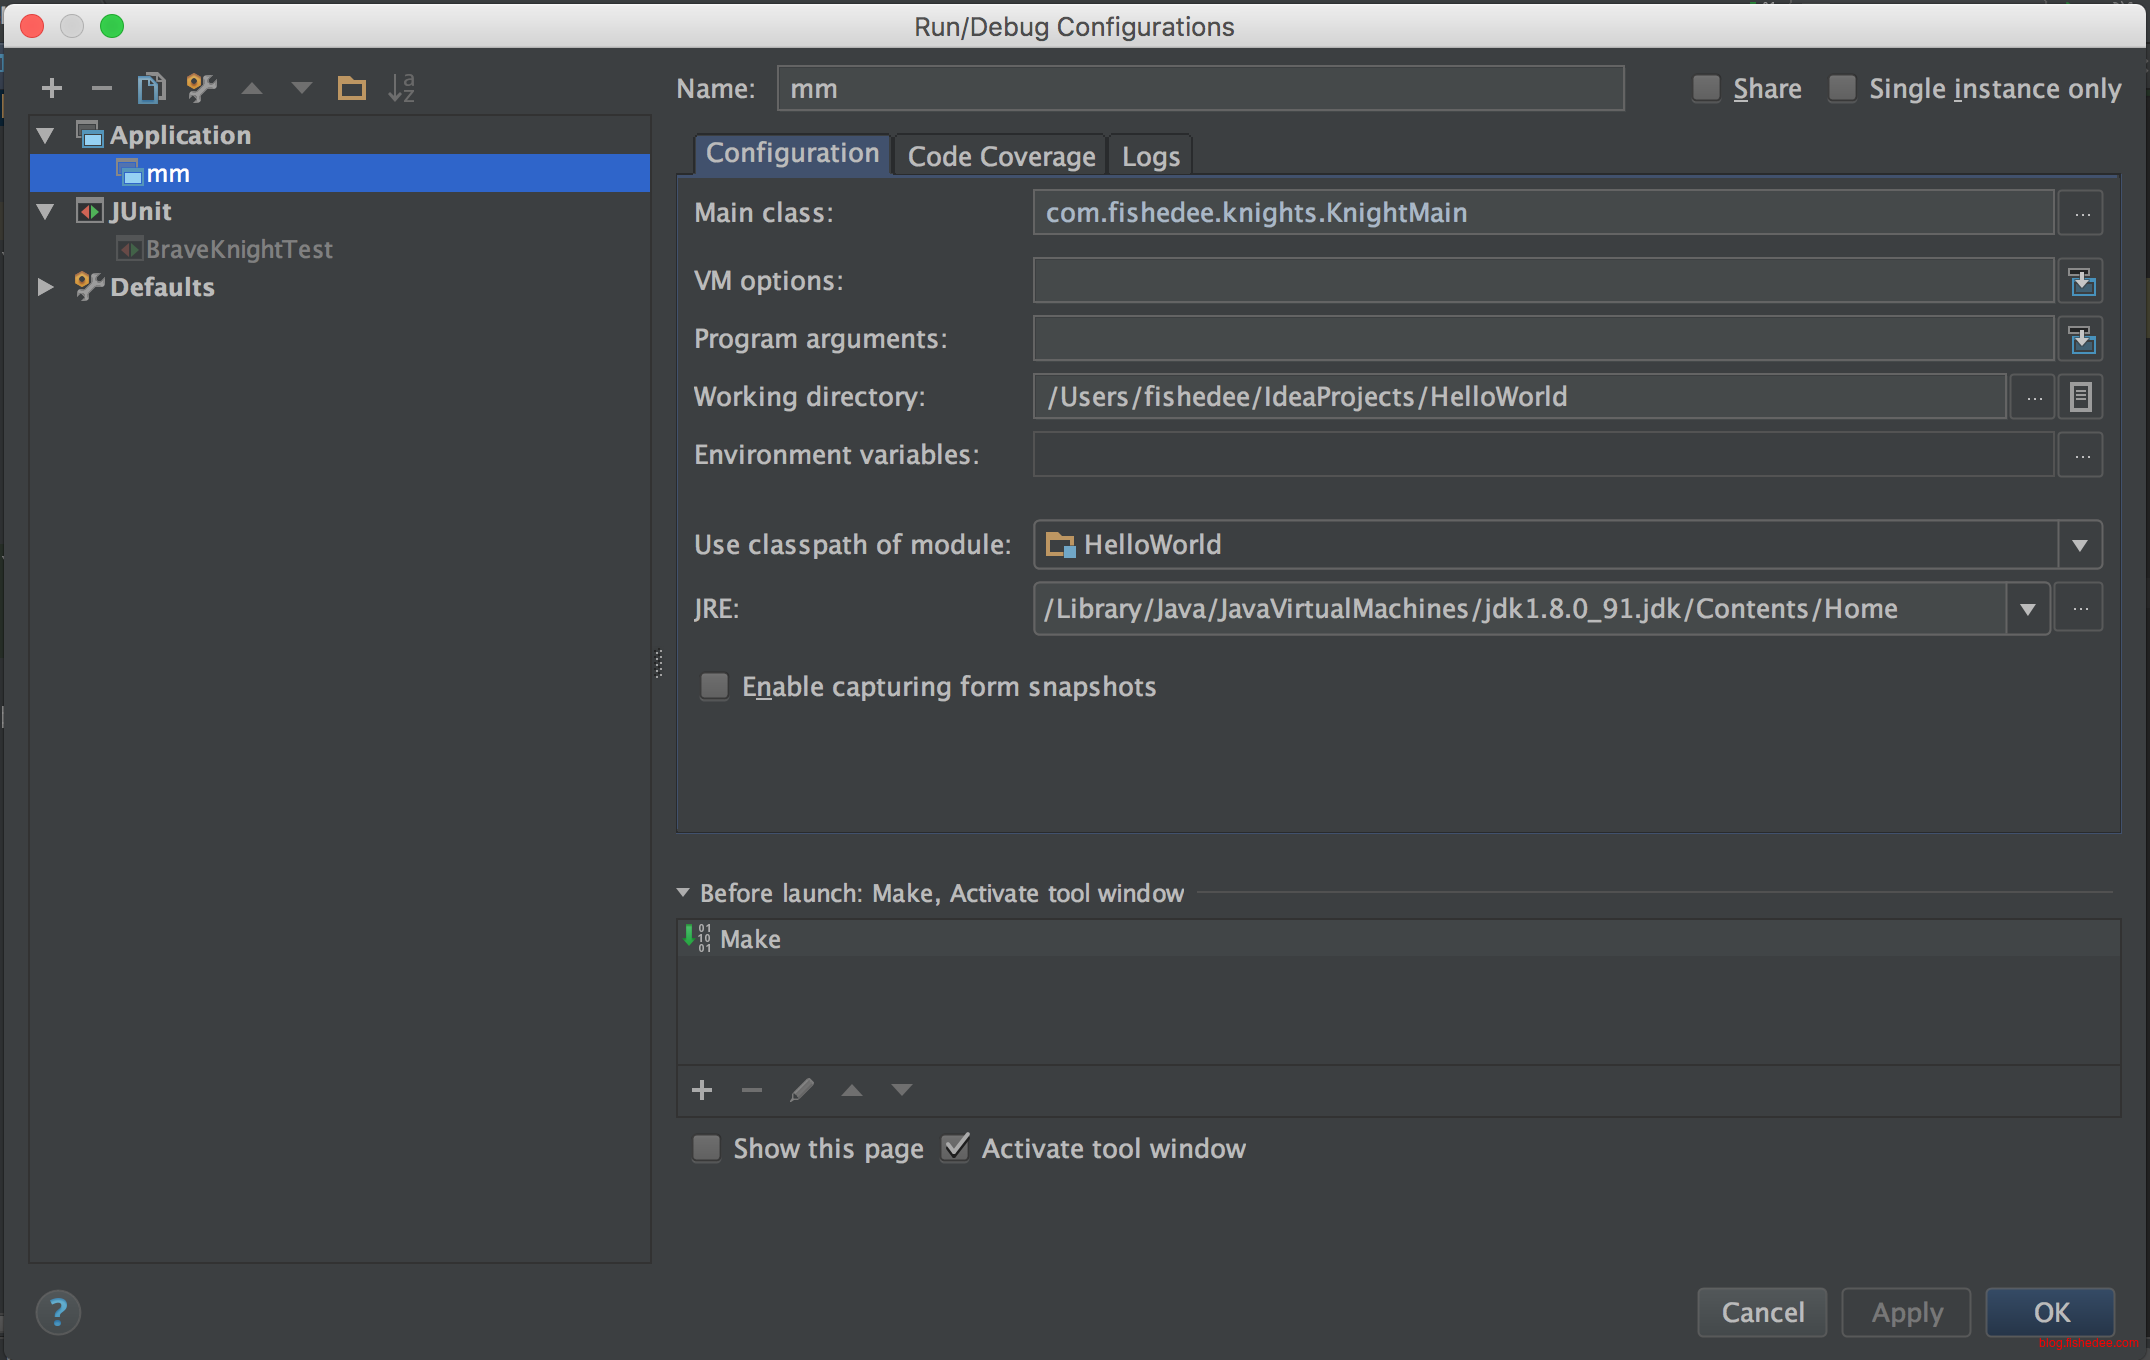
将入口Class指向到KnightMain
2.2 IOC
package com.fishedee.knights;

/**
 * Created by fishedee on 24/11/2016.
 */
public interface Knight {
    void embarkOnQuest();
}
建立Kngiht接口
package com.fishedee.knights;

import java.util.Queue;

/**
 * Created by fishedee on 24/11/2016.
 */
public class BraveKnight implements Knight{
    private Quest quest;

    public BraveKnight(Quest quest){
        this.quest = quest;
    }

    public void embarkOnQuest(){
        quest.embark();
    }
}
建立BraveKnight类
package com.fishedee.knights;

/**
 * Created by fishedee on 24/11/2016.
 */
public interface Quest {
    public void embark();
}
建立Quest接口
package com.fishedee.knights;

import java.io.PrintStream;
import java.util.Queue;

/**
 * Created by fishedee on 24/11/2016.
 */
public class SlayDragonQuest implements Quest{
    public PrintStream stream;

    public SlayDragonQuest(PrintStream stream){
        this.stream = stream;
    }

    public void embark(){
        stream.println("Embarking on quest to slay the dragon!");
    }
}
建立SlayDragonQuest
package com.fishedee.knights;

import org.springframework.context.support.ClassPathXmlApplicationContext;

/**
 * Created by fishedee on 24/11/2016.
 */
public class KnightMain {
    public static void main(String[] args) throws Exception{
        ClassPathXmlApplicationContext context = new ClassPathXmlApplicationContext("knights.xml");
        Knight knight = context.getBean(Knight.class);
        knight.embarkOnQuest();
        context.close();
    }
}
建立KnightMain
<?xml version="1.0" encoding="UTF-8"?>
<beans xmlns="http://www.springframework.org/schema/beans"
       xmlns:xsi="http://www.w3.org/2001/XMLSchema-instance"
       xsi:schemaLocation="http://www.springframework.org/schema/beans http://www.springframework.org/schema/beans/spring-beans.xsd">
    <bean id="quest" class="com.fishedee.knights.SlayDragonQuest">
        <constructor-arg value="#{T(System).out}"/>
    </bean>
    <bean id="knight" class="com.fishedee.knights.BraveKnight">
        <constructor-arg ref="quest"/>
    </bean>
</beans>
建立kngihts.xml的配置文件
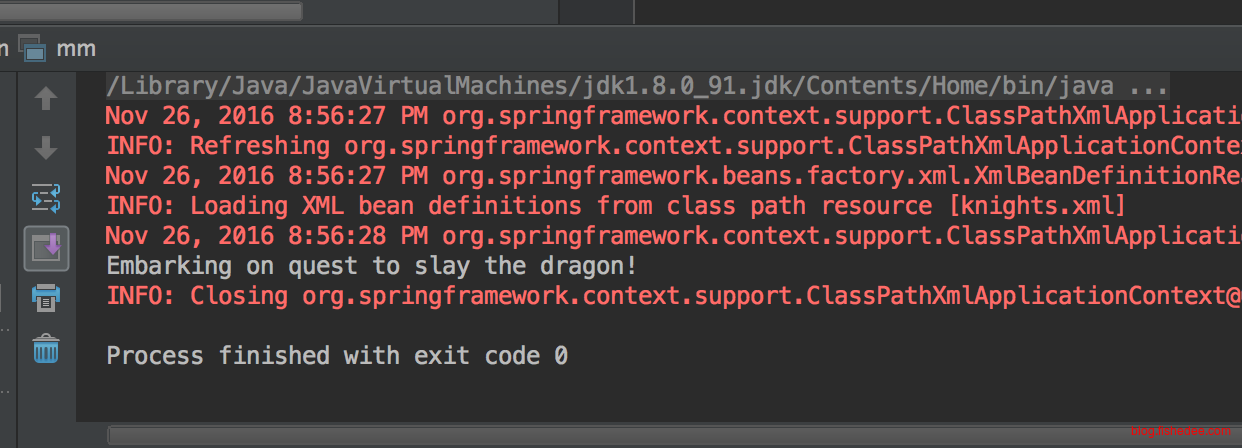
运行程序后就能看到Embarking onquest的输出了
在这个程序中可以看到Spring关于ioc的重要特点
- 依赖的对象不直接引用,而是只引用接口
- 对象的创建与注入由Spring来决定,Spring可以根据xml配置来创建对象
这样的ioc就有很特别的能力了
- 依赖解耦,依赖对象只要满足接口就能自由替换,不影响使用方的代码
- 依赖封装,Spring可以在注入对象时,对对象执行变形,例如封装远程调用,mock打桩,进行日志输出等操作
package com.fishedee.knights;

import org.junit.Test;
import static org.mockito.Mockito.*;
import static org.junit.Assert.*;

/**
 * Created by fishedee on 24/11/2016.
 */
public class BraveKnightTest {

    @Test
    public void testEmbarkOnQuest() throws Exception {
        Quest mockQuest = mock(Quest.class);
        BraveKnight knight = new BraveKnight(mockQuest);
        knight.embarkOnQuest();
        verify(mockQuest,times(1)).embark();
    }
}
例如,BraveKnight依赖的Quest对象,由于BraveKnight依赖的是接口,不是具体实现,我们就能对Quest进行很容易的mock,从而简单地单元测试
2.3 AOP
package com.fishedee.knights;

import java.io.PrintStream;

/**
 * Created by fishedee on 26/11/2016.
 */
public class Minstrel {

    private PrintStream stream;

    public Minstrel(PrintStream stream){
        this.stream = stream;
    }

    public void singBeforeQuest(){
        stream.println("Fa la la");
    }

    public void singAfterQuest(){
        stream.println("Tea bee bee");
    }
}
建立Minstrel类
<?xml version="1.0" encoding="UTF-8"?>
<beans xmlns="http://www.springframework.org/schema/beans"
       xmlns:xsi="http://www.w3.org/2001/XMLSchema-instance"
       xmlns:aop="http://www.springframework.org/schema/aop"
       xsi:schemaLocation="http://www.springframework.org/schema/beans
       http://www.springframework.org/schema/beans/spring-beans.xsd
       http://www.springframework.org/schema/aop
       http://www.springframework.org/schema/aop/spring-aop-3.2.xsd">
    <bean id="quest" class="com.fishedee.knights.SlayDragonQuest">
        <constructor-arg value="#{T(System).out}"/>
    </bean>
    <bean id="knight" class="com.fishedee.knights.BraveKnight">
        <constructor-arg ref="quest"/>
    </bean>
    <bean id="minstrel" class="com.fishedee.knights.Minstrel">
        <constructor-arg value="#{T(System).out}"/>
    </bean>

    <aop:config>
        <aop:aspect ref="minstrel">
            <aop:pointcut id="embark"
                expression="execution(* *.embarkOnQuest(..))"/>
            <aop:before pointcut-ref="embark"
                method="singBeforeQuest"/>
            <aop:after pointcut-ref="embark"
                       method="singAfterQuest"/>
        </aop:aspect>
    </aop:config>
</beans>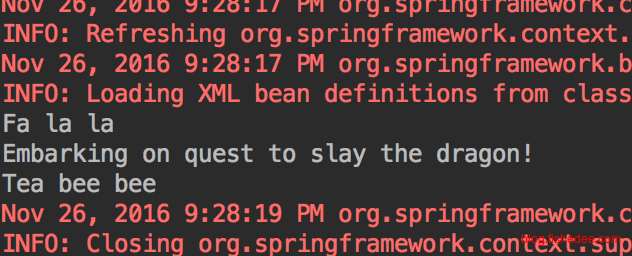
启动后看到Embark前后执行对对应的输出
修改配置文件,将Minstrel声明为切面,当调用embarkOnQuest方法时会自动回调Minstrel的方法
就这样,Spring在不修改Knight与Quest的代码下,就能在其方法执行前后插入自己想要的代码,这让我们能达成简单的cache,日志,事务等切面式的实现了
3 基础ioc
Spring中提供三种装配bean的方法
- 在xml中进行显式配置
- 在Java中进行显式配置
- 隐式的bean发现机制和自动装配
3.1 在xml中装配
第2章已经写过,就不多说了
3.2 在java中装配
package com.fishedee.knights;

import org.springframework.context.annotation.Bean;
import org.springframework.context.annotation.Configuration;

/**
 * Created by fishedee on 26/11/2016.
 */
@Configuration
public class Config {
    @Bean
    public Quest quest(){
        return new SlayDragonQuest();
    }

    @Bean
    public Knight knight(Quest quest){
        return new BraveKnight(quest);
    }
}
代替xml,使用Java文件来做配置,要注意用Configuration声明配置文件,生成bean的方法都用Bean注解
package com.fishedee.knights;

import org.springframework.context.annotation.AnnotationConfigApplicationContext;
import org.springframework.context.support.ClassPathXmlApplicationContext;

/**
 * Created by fishedee on 24/11/2016.
 */
public class KnightMain {
    public static void main(String[] args) throws Exception{
        AnnotationConfigApplicationContext context = new AnnotationConfigApplicationContext(Config.class);
        Knight knight = context.getBean(Knight.class);
        knight.embarkOnQuest();
        context.close();
    }
}
启动ApplicationContext改用AnnotationConfigApplicationContext即可
使用Java装配的好处是,强类型,支持丰富的java语法特性
3.3 自动装配
package com.fishedee.knights;

import org.springframework.stereotype.Component;

import java.io.PrintStream;
import java.util.Queue;

/**
 * Created by fishedee on 24/11/2016.
 */
@Component
public class SlayDragonQuest implements Quest{
    public PrintStream stream;

    public SlayDragonQuest(){
        this.stream = System.out;
    }

    public void embark(){
        stream.println("Embarking on quest to slay the dragon!");
    }
}
将SlayDragonQuest声明为bean,加入@Component即可
package com.fishedee.knights;

import org.springframework.stereotype.Component;

import java.util.Queue;

/**
 * Created by fishedee on 24/11/2016.
 */
@Component
public class BraveKnight implements Knight{
    private Quest quest;

    public BraveKnight(Quest quest){
        this.quest = quest;
    }

    public void embarkOnQuest(){
        quest.embark();
    }
}
将BraveKnight声明为bean,同时Quest出现在构造参数上,这个Quest类型会被自动装配
package com.fishedee.knights;

import org.springframework.beans.factory.annotation.Autowired;
import org.springframework.stereotype.Component;

import java.util.Queue;

/**
 * Created by fishedee on 24/11/2016.
 */
@Component
public class BraveKnight implements Knight{
    @Autowired
    private Quest quest;

    public BraveKnight(){

    }

    public void embarkOnQuest(){
        quest.embark();
    }
}
或者可以将Quest写上Autowired注解,这个私有变量也会被自动装配
package com.fishedee.knights;

import org.junit.Test;
import org.junit.runner.RunWith;
import org.springframework.beans.factory.annotation.Autowired;
import org.springframework.test.context.ContextConfiguration;
import org.springframework.test.context.junit4.SpringJUnit4ClassRunner;

import static org.mockito.Mockito.*;
import static org.junit.Assert.*;

/**
 * Created by fishedee on 24/11/2016.
 */
@RunWith(SpringJUnit4ClassRunner.class)
@ContextConfiguration(classes = Config.class)
public class BraveKnightTest {
    @Autowired
    BraveKnight knight;

    @Test
    public void testEmbarkOnQuest() throws Exception {
        knight.embarkOnQuest();
    }
}
自动装配也支持单元测试,注意测试文件中指定Config
<?xml version="1.0" encoding="UTF-8"?>
<beans xmlns="http://www.springframework.org/schema/beans"
       xmlns:xsi="http://www.w3.org/2001/XMLSchema-instance"
       xmlns:aop="http://www.springframework.org/schema/aop"
       xmlns:context="http://www.springframework.org/schema/context"
       xsi:schemaLocation="http://www.springframework.org/schema/beans
       http://www.springframework.org/schema/beans/spring-beans.xsd
       http://www.springframework.org/schema/aop
       http://www.springframework.org/schema/aop/spring-aop-4.1.xsd
       http://www.springframework.org/schema/context
       http://www.springframework.org/schema/context/spring-context-4.1.xsd">
    <context:component-scan base-package="com.fishedee.knights"/>

    <aop:config>
        <aop:aspect ref="minstrel">
            <aop:pointcut id="embark"
                expression="execution(* *.embarkOnQuest(..))"/>
            <aop:before pointcut-ref="embark"
                method="singBeforeQuest"/>
            <aop:after pointcut-ref="embark"
                       method="singAfterQuest"/>
        </aop:aspect>
    </aop:config>
</beans>
在xml配置文件中加入component-scan,并指定包名即可
package com.fishedee.knights;

import org.springframework.context.annotation.Bean;
import org.springframework.context.annotation.ComponentScan;
import org.springframework.context.annotation.Configuration;

/**
 * Created by fishedee on 26/11/2016.
 */
@Configuration
@ComponentScan
public class Config {
}
或在Java配置中,加入ComponentScan注解即可,非常简单
自动装配能大幅度减少需要配置的bean,所以使用中一般是自动装配为主,Java装配为辅的方式
3.4 混合配置
package com.fishedee.knights;

import org.springframework.context.annotation.*;

/**
 * Created by fishedee on 26/11/2016.
 */
@Configuration
@ComponentScan
@Import(Config2.class)
@ImportResource("knights.xml")
public class Config {
}
Java配置中引入其他Java配置,或者引入其他xml配置的方法
<?xml version="1.0" encoding="UTF-8"?>
<beans xmlns="http://www.springframework.org/schema/beans"
       xmlns:xsi="http://www.w3.org/2001/XMLSchema-instance"
       xmlns:aop="http://www.springframework.org/schema/aop"
       xmlns:context="http://www.springframework.org/schema/context"
       xsi:schemaLocation="http://www.springframework.org/schema/beans
       http://www.springframework.org/schema/beans/spring-beans.xsd
       http://www.springframework.org/schema/aop
       http://www.springframework.org/schema/aop/spring-aop-4.1.xsd
       http://www.springframework.org/schema/context
       http://www.springframework.org/schema/context/spring-context-4.1.xsd">
    <import resource="knights2.xml"/>
</beans>
xml配置中引入其他xml配置的方式,注意,不能用xml引入Java配置
4 高级ioc
4.1 环境装配
package com.fishedee.knights;

import org.springframework.context.annotation.*;

import java.io.PrintStream;

/**
 * Created by fishedee on 26/11/2016.
 */
@Configuration
@ComponentScan
public class Config {

    @Bean
    @Profile("dev")
    public PrintStream printStream(){
        return System.out;
    }

    @Bean
    @Profile("prod")
    public PrintStream printStream2()throws Exception{
        return new PrintStream("fish.out");
    }
}
可以在Config上加入Profile注解,用来表明这个bean配置是在哪个环境上使用的,当然也可以将Profile注解放到Config上,表明这个Config都是Profile指定的
package com.fishedee.knights;

import org.springframework.context.annotation.AnnotationConfigApplicationContext;
import org.springframework.context.support.ClassPathXmlApplicationContext;
import org.springframework.core.env.ConfigurableEnvironment;

/**
 * Created by fishedee on 24/11/2016.
 */
public class KnightMain {
    public static void main(String[] args) throws Exception{
        AnnotationConfigApplicationContext context = new AnnotationConfigApplicationContext();
        context.getEnvironment().setActiveProfiles("prod");
        context.register(Config.class);
        context.refresh();
        //ClassPathXmlApplicationContext context = new ClassPathXmlApplicationContext("knights.xml");
        Knight knight = context.getBean(Knight.class);
        knight.embarkOnQuest();
        context.close();
    }
}
启动时可以根据context来指定profile
package com.fishedee.knights;

import org.junit.Test;
import org.junit.runner.RunWith;
import org.springframework.beans.factory.annotation.Autowired;
import org.springframework.test.context.ActiveProfiles;
import org.springframework.test.context.ContextConfiguration;
import org.springframework.test.context.junit4.SpringJUnit4ClassRunner;

import static org.mockito.Mockito.*;
import static org.junit.Assert.*;

/**
 * Created by fishedee on 24/11/2016.
 */
@RunWith(SpringJUnit4ClassRunner.class)
@ContextConfiguration(classes = Config.class)
@ActiveProfiles("dev")
public class BraveKnightTest {
    @Autowired
    BraveKnight knight;

    @Test
    public void testEmbarkOnQuest() throws Exception {
        knight.embarkOnQuest();
    }
}
单元测试中可以根据ActiveProfiles注解来指定环境
4.2 条件装配
package com.fishedee.knights;

import org.springframework.context.annotation.*;

import java.io.PrintStream;

/**
 * Created by fishedee on 26/11/2016.
 */
@Configuration
@ComponentScan
public class Config {

    @Bean
    @Conditional(ConfigCondition.class)
    public PrintStream printStream(){
        return System.out;
    }

    @Bean
    @Profile("prod")
    public PrintStream printStream2()throws Exception{
        return new PrintStream("fish.out");
    }
}
指定printStream生成condition为ConfigCondition.class
package com.fishedee.knights;

import org.springframework.context.annotation.Condition;
import org.springframework.context.annotation.ConditionContext;
import org.springframework.core.type.AnnotatedTypeMetadata;

/**
 * Created by fishedee on 27/11/2016.
 */
public class ConfigCondition implements Condition{
    public boolean matches(ConditionContext context, AnnotatedTypeMetadata metadata){
        String[] profiles = context.getEnvironment().getActiveProfiles();
        for( String single : profiles ){
            if( single.equals("fish")){
                return true;
            }
        }
        return false;
    }
}
而ConfigCondition则是检查profile是否为fish
所以,条件装配是比环境装配更为强大而动态的方式而已。
4.3 指定装配
No qualifying bean of type 'com.fishedee.knights.Quest' available: expected single matching bean but found 2: slayDragonQuest,slayHumanQuest如果我有两个Quest都满足Quest接口时,Spring就会弹出错误,说有歧义,slayDragonQuest和slayHumanQuest
package com.fishedee.knights;

import org.springframework.context.annotation.Primary;
import org.springframework.stereotype.Component;

import java.io.PrintStream;
import java.util.Queue;

/**
 * Created by fishedee on 24/11/2016.
 */
@Component
@Primary
public class SlayDragonQuest implements Quest{
    public PrintStream stream;

    public SlayDragonQuest(PrintStream stream){
        this.stream = stream;
    }

    public void embark(){
        stream.println("Embarking on quest to slay the dragon!");
    }
}
解决办法一,给SlayDragonQuest给予Primary优先级,默认选择它
package com.fishedee.knights;

import org.springframework.beans.factory.annotation.Autowired;
import org.springframework.beans.factory.annotation.Qualifier;
import org.springframework.stereotype.Component;

import java.util.Queue;

/**
 * Created by fishedee on 24/11/2016.
 */
@Component
public class BraveKnight implements Knight{

    @Autowired
    @Qualifier("slayDragonQuest")
    private Quest quest;


    public BraveKnight(){
    }

    public void embarkOnQuest(){
        quest.embark();
    }
}
解决办法二,让Knight指定哪个Quest,用Qualifier注解
4.4 作用域
Spring创建的bean,有以下几种作用域
- 单例(Singleton),整个应用只有一个bean实例
- 原型(Prototype),每次都创建一个bean实例
- 会话(Session),在Web中,每个会话创建一个bean实例
- 请求(Request),在Web中,每个请求创建一个bean实例
默认情况下,所有的bean都是单例会话域
package com.fishedee.knights;

import org.springframework.beans.factory.annotation.Autowired;
import org.springframework.beans.factory.annotation.Qualifier;
import org.springframework.beans.factory.config.ConfigurableBeanFactory;
import org.springframework.context.annotation.Scope;
import org.springframework.context.annotation.ScopedProxyMode;
import org.springframework.stereotype.Component;

import java.util.Queue;

/**
 * Created by fishedee on 24/11/2016.
 */
@Component
@Scope(
        value=ConfigurableBeanFactory.SCOPE_PROTOTYPE,
        proxyMode = ScopedProxyMode.INTERFACES
)
public class BraveKnight implements Knight{

    @Autowired
    @Qualifier("slayDragonQuest")
    private Quest quest;


    public BraveKnight(){
    }

    public void embarkOnQuest(){
        quest.embark();
    }
}
在bean中使用Scope注解就可以了,注意多例插入到单例对象中,需要用INTERFACES的proxy
5 aop
5.1 基础切面
在Spring中,切面有以下的几种
- After,在目标方法返回或抛出异常后调用
- AfterReturning,在目标方法返回后调用
- AfterThrowing,在目标方法抛出异常后调用
- Before,在目标方法调用之前调用
- Around,将目标方法封装起来
package com.fishedee.knights;

import org.aspectj.lang.annotation.After;
import org.aspectj.lang.annotation.Aspect;
import org.aspectj.lang.annotation.Before;
import org.aspectj.lang.annotation.Pointcut;
import org.springframework.stereotype.Component;

import java.io.PrintStream;

/**
 * Created by fishedee on 26/11/2016.
 */
@Component
@Aspect
public class Minstrel {

    private PrintStream stream;

    public Minstrel(){
        stream = System.out;
    }

    @Pointcut("execution(* *.embarkOnQuest(..))")
    public void quest(){}

    @Before("quest()")
    public void singBeforeQuest(){
        stream.println("Fa la la");
    }

    @After("quest()")
    public void singAfterQuest(){
        stream.println("Tea bee bee");
    }
}
将Minstrel方法用Aspect注解圈起来,然后在触发方法上,加入Pointcut,Before,After等触发类型即可
package com.fishedee.knights;

import org.springframework.context.annotation.*;

import java.io.PrintStream;

/**
 * Created by fishedee on 26/11/2016.
 */
@Configuration
@EnableAspectJAutoProxy
@ComponentScan
public class Config {
    @Bean
    public PrintStream printStream(){
        return System.out;
    }
}
配置上开启EnableAspectJAutoProxy注解
5.2 切面参数
package com.fishedee.knights;

import org.aspectj.lang.ProceedingJoinPoint;
import org.aspectj.lang.annotation.*;
import org.springframework.stereotype.Component;

import java.io.PrintStream;

/**
 * Created by fishedee on 26/11/2016.
 */
@Component
@Aspect
public class Minstrel {

    private PrintStream stream;

    public Minstrel(){
        stream = System.out;
    }

    @Pointcut("execution(* *.embark(int)) && args(embarkPower)")
    public void quest(int embarkPower){}

    @Around("quest(embarkPower2)")
    public void aroundQuest(ProceedingJoinPoint jp,int embarkPower2)throws Throwable{
        try {
            stream.println("Fa la la");
            stream.println("Power "+embarkPower2);
            jp.proceed();
        }finally{
            stream.println("Tea bee bee");
        }
    }
}
在Pointcut中指定包含参数的函数类型,以及args指定参数名称,然后在Around上也指定接收参数即可。注意,在Around上要调用原函数。
6 基础MVC
6.1 Intellij IDEA
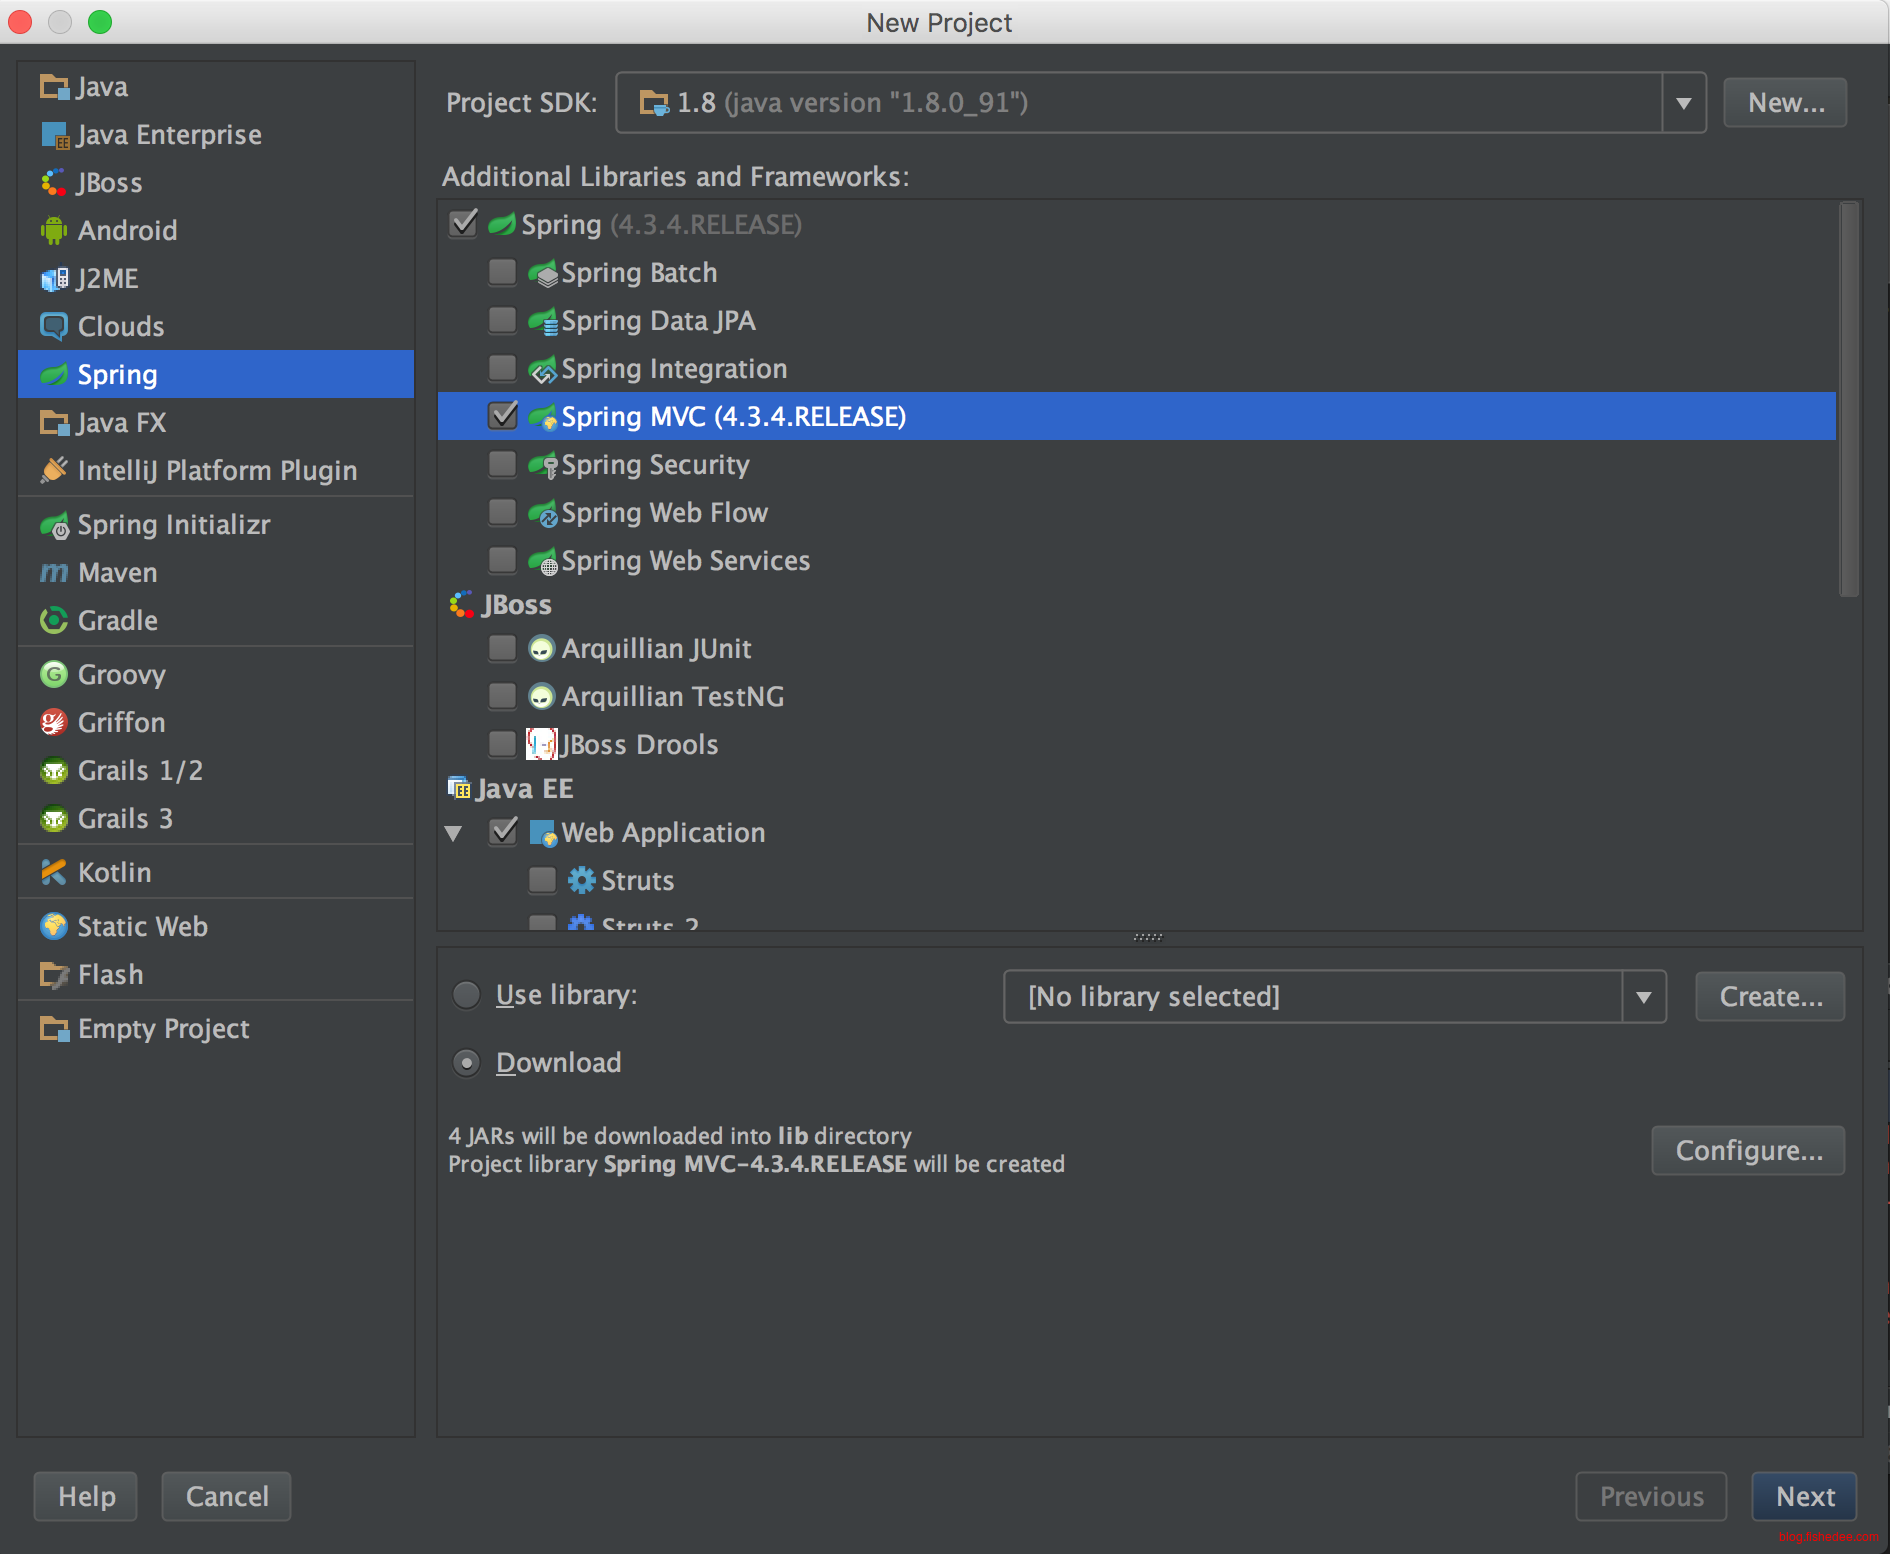
创建一个勾选了MVC选项的Spring项目
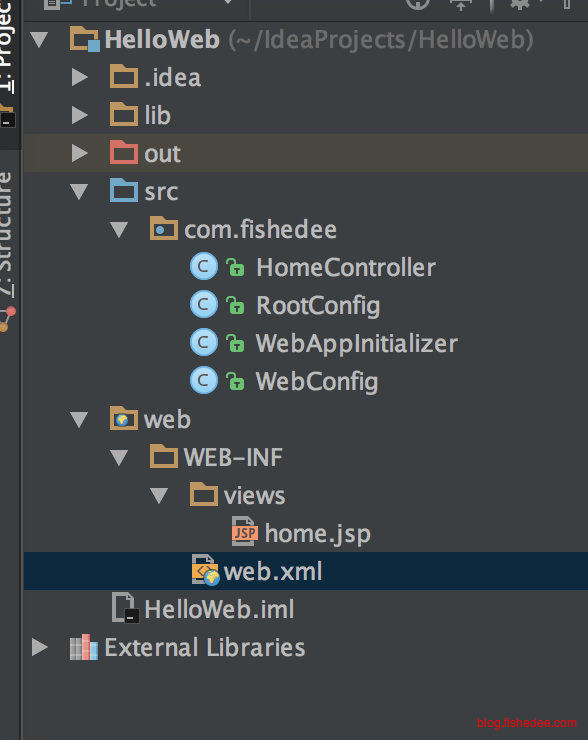
建立以上的文件和文件夹
<?xml version="1.0" encoding="UTF-8"?>
<web-app xmlns="http://xmlns.jcp.org/xml/ns/javaee"
         xmlns:xsi="http://www.w3.org/2001/XMLSchema-instance"
         xsi:schemaLocation="http://xmlns.jcp.org/xml/ns/javaee http://xmlns.jcp.org/xml/ns/javaee/web-app_3_1.xsd"
         version="3.1">
</web-app>
web.xml为空
<%--
  Created by IntelliJ IDEA.
  User: fishedee
  Date: 28/11/2016
  Time: 9:11 PM
  To change this template use File | Settings | File Templates.
--%>
<%@ page contentType="text/html;charset=UTF-8" language="java" %>
<html>
  <head>
    <title>Spring MVC</title>
  </head>
  <body>
    Hello World
  </body>
</html>
home.jsp为简单的jsp文件
package com.fishedee;

import org.springframework.web.servlet.support.AbstractAnnotationConfigDispatcherServletInitializer;

/**
 * Created by fishedee on 29/11/2016.
 */
public class WebAppInitializer extends AbstractAnnotationConfigDispatcherServletInitializer {
    @Override
    protected String[] getServletMappings(){
        System.out.println("uu");
        return new String[]{"/"};
    }

    @Override
    protected Class<?>[] getRootConfigClasses(){
        return new Class<?>[]{RootConfig.class};
    }

    @Override
    protected Class<?>[] getServletConfigClasses(){
        return new Class<?>[]{WebConfig.class};
    }
}
WebAppInitializer为入口的serlet文件,getRootConfigClasses指向通用bean的配置文件,getServletConfigClasses指向mvc使用的bean的配置文件
package com.fishedee;

import org.springframework.context.annotation.Bean;
import org.springframework.context.annotation.ComponentScan;
import org.springframework.context.annotation.Configuration;
import org.springframework.web.servlet.ViewResolver;
import org.springframework.web.servlet.config.annotation.DefaultServletHandlerConfigurer;
import org.springframework.web.servlet.config.annotation.EnableWebMvc;
import org.springframework.web.servlet.config.annotation.WebMvcConfigurerAdapter;
import org.springframework.web.servlet.view.InternalResourceViewResolver;

/**
 * Created by fishedee on 29/11/2016.
 */
@Configuration
@EnableWebMvc
public class RootConfig {

}
RootConfig基本为空
package com.fishedee;

import org.springframework.context.annotation.Bean;
import org.springframework.context.annotation.ComponentScan;
import org.springframework.context.annotation.Configuration;
import org.springframework.web.servlet.ViewResolver;
import org.springframework.web.servlet.config.annotation.DefaultServletHandlerConfigurer;
import org.springframework.web.servlet.config.annotation.EnableWebMvc;
import org.springframework.web.servlet.config.annotation.WebMvcConfigurerAdapter;
import org.springframework.web.servlet.view.InternalResourceViewResolver;

/**
 * Created by fishedee on 29/11/2016.
 */
@Configuration
@EnableWebMvc
@ComponentScan
public class WebConfig extends WebMvcConfigurerAdapter {
    @Bean
    public ViewResolver viewResolver(){
        InternalResourceViewResolver resolver = new InternalResourceViewResolver();
        resolver.setPrefix("/WEB-INF/views/");
        resolver.setSuffix(".jsp");
        resolver.setExposeContextBeansAsAttributes(true);
        return resolver;
    }

    @Override
    public void configureDefaultServletHandling(DefaultServletHandlerConfigurer configurer){
        configurer.enable();
    }
}
WebConfig配置了视图解析器,还有默认的路由处理
package com.fishedee;

import org.springframework.stereotype.Controller;
import org.springframework.web.bind.annotation.RequestMapping;
import org.springframework.web.bind.annotation.RequestMethod;

/**
 * Created by fishedee on 29/11/2016.
 */
@Controller
public class HomeController {

    @RequestMapping(value="/",method= RequestMethod.GET)
    public String home(){
        return "home";
    }
}
HomeController的代码
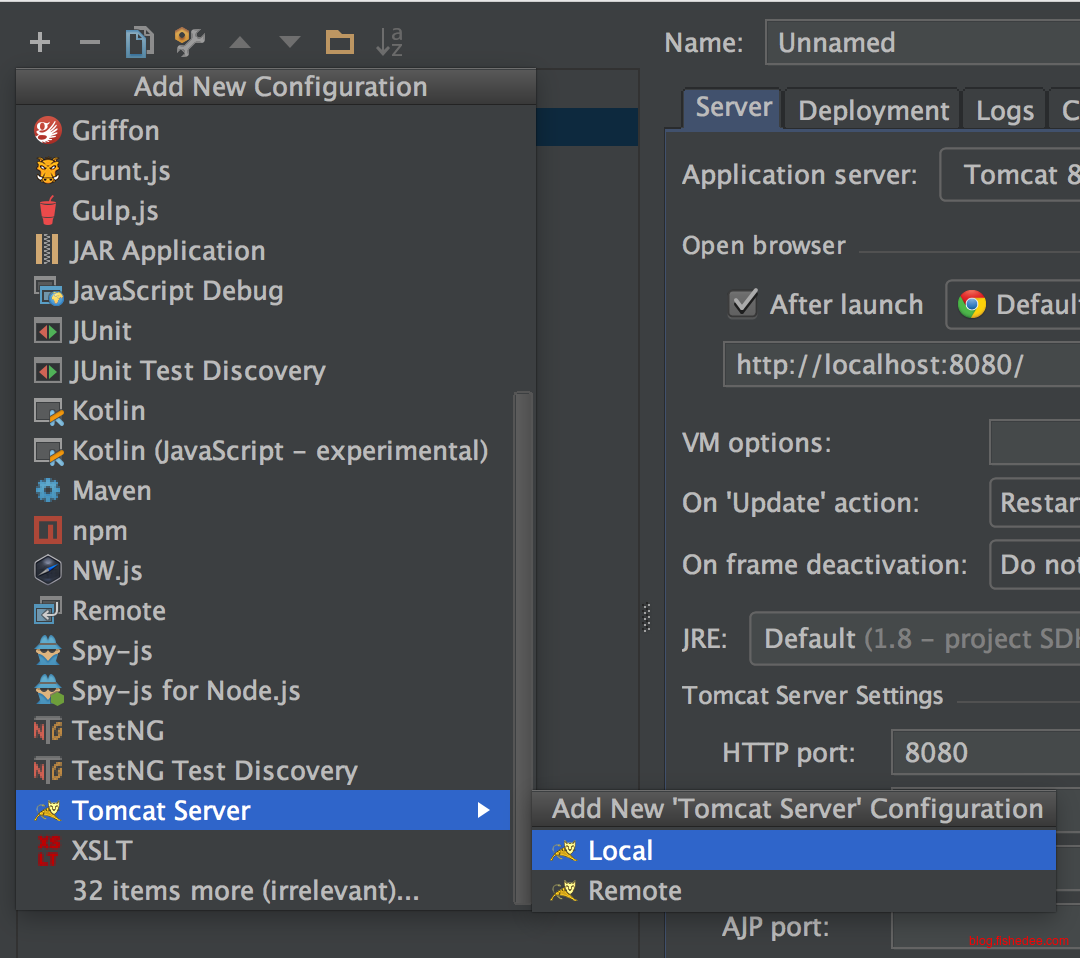
增加tomcat的启动选项
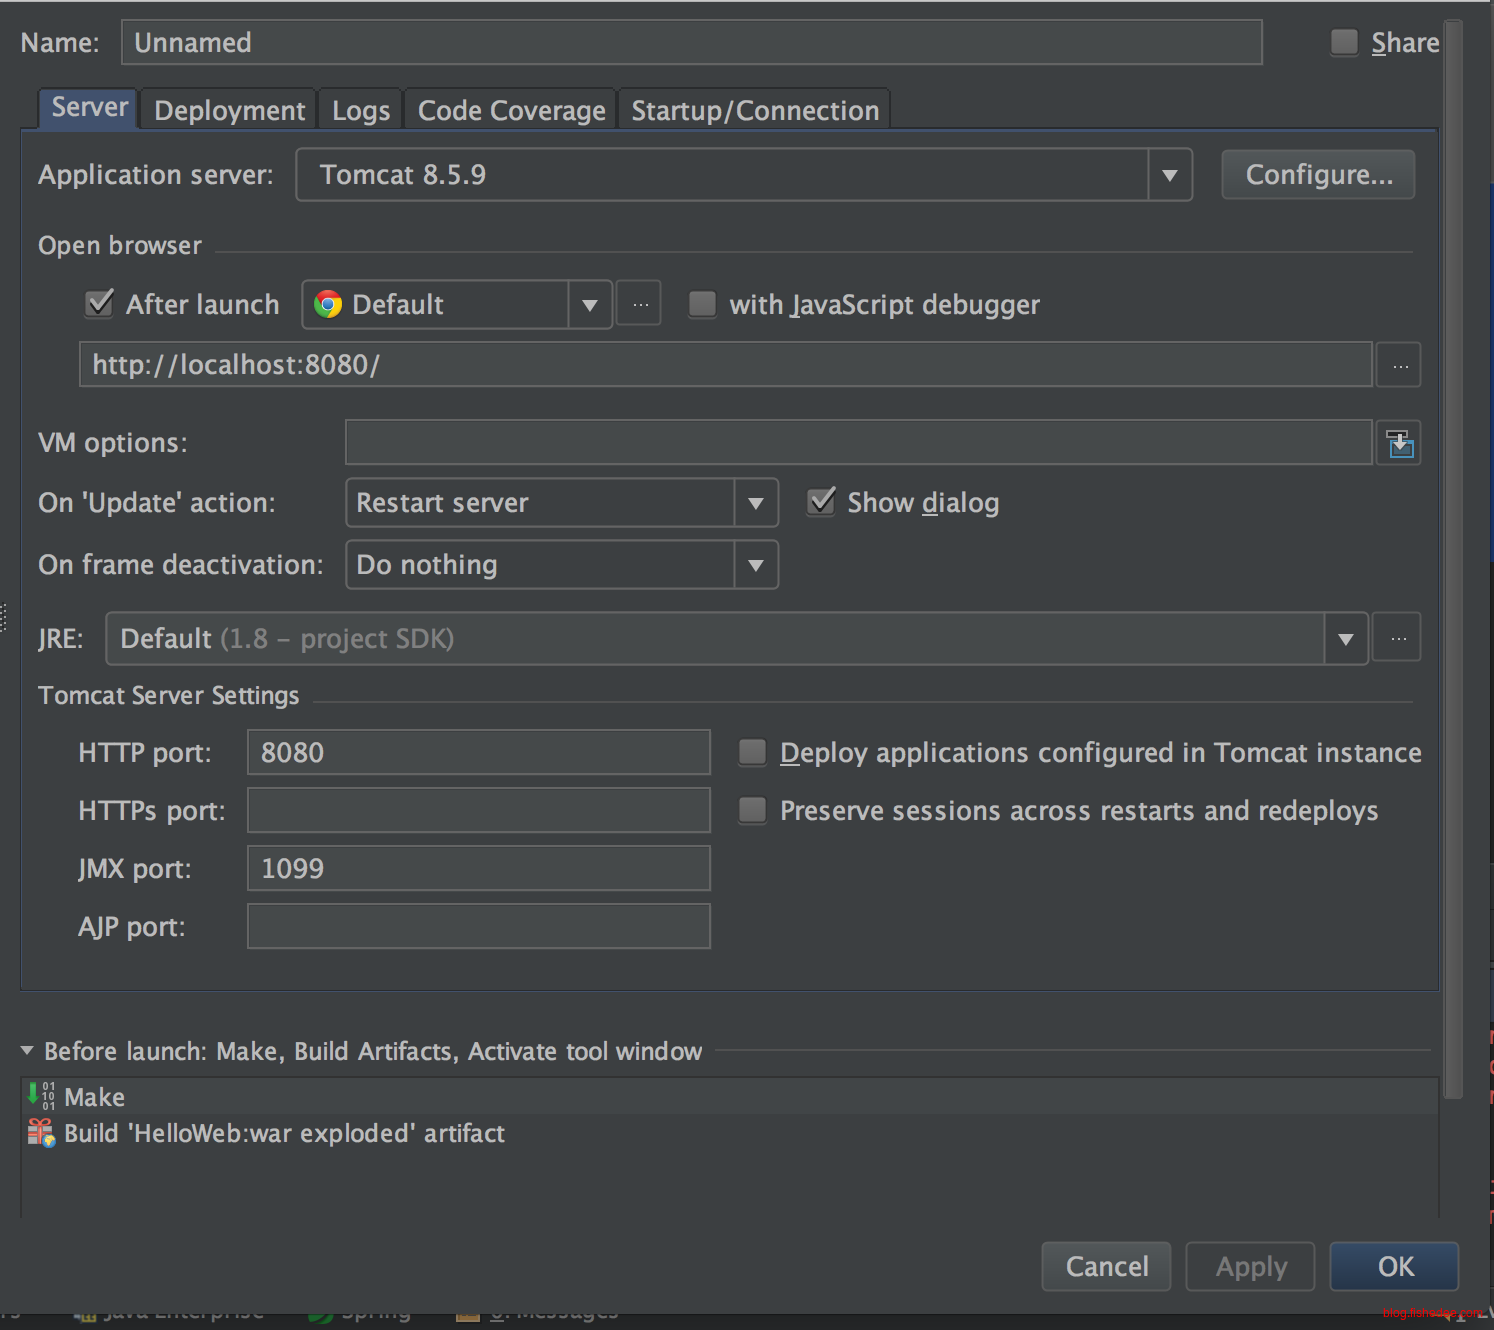
让server指向到tomcat的安装目录就可以了,注意tomcat必须是7以上的版本
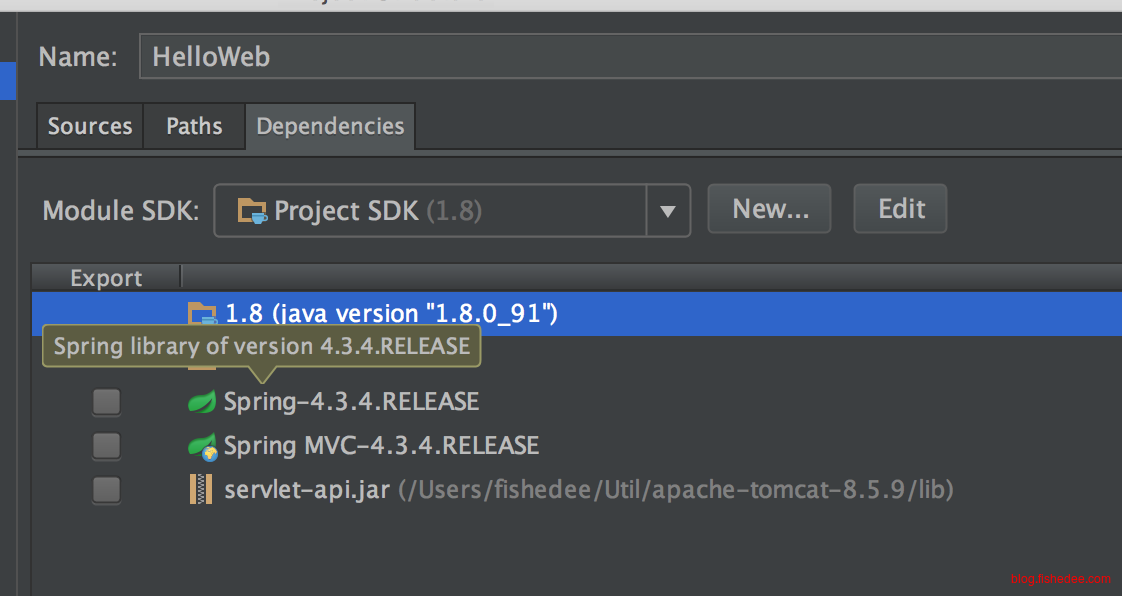
项目依赖中加入tomcat安装目录中lib文件的servlet-api.jar文件
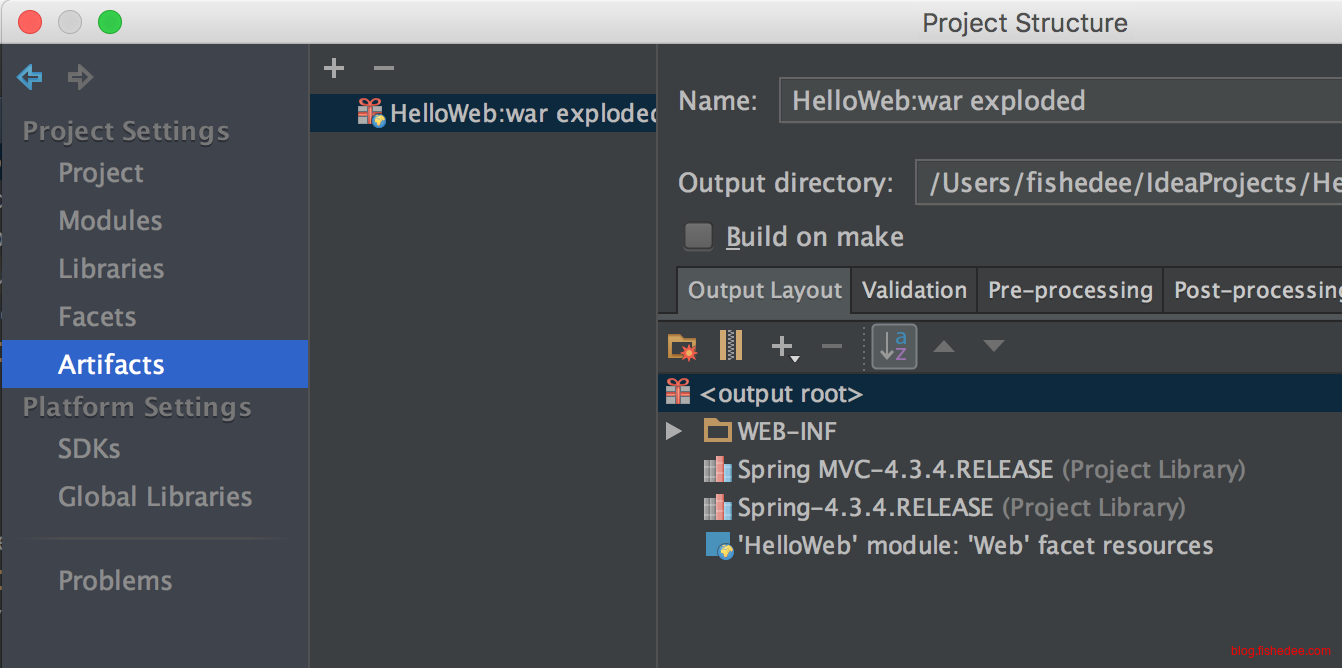
打包选项中将Spring依赖都打包进去就可以了
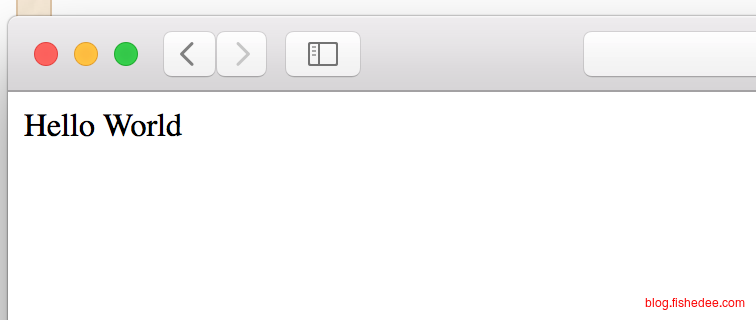
最后,就是启动服务器了,这时,你应该看到Hello World的输出了
6.2 控制器
/**
 * Created by fishedee on 29/11/2016.
 */
@Controller
public class HomeController {

    @RequestMapping(value="/",method= RequestMethod.GET)
    public String home(){
        return "home";
    }
}
简单的controller,返回值是视图的名称
package com.fishedee;

import org.springframework.stereotype.Controller;
import org.springframework.web.bind.annotation.RequestMapping;
import org.springframework.web.bind.annotation.RequestMethod;
import org.springframework.ui.Model;

/**
 * Created by fishedee on 29/11/2016.
 */
@Controller
public class HomeController {

    @RequestMapping(value="/",method= RequestMethod.GET)
    public String home(Model model){
        model.addAttribute("text","Hello Fish");
        return "home";
    }
}
新增Model参数,将视图的数据写入到Model中
<%@ taglib uri="http://java.sun.com/jsp/jstl/core" prefix="c" %>
<%@ page contentType="text/html;charset=UTF-8" language="java" %>
<html>
  <head>
    <title>Spring MVC</title>
  </head>
  <body>
    <c:out value="${text}"/>
  </body>
</html>
home.jsp加入taglib,用c:out标签输出text参数
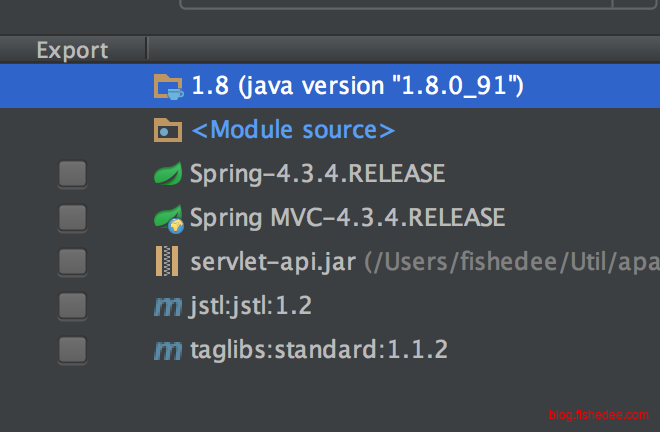
加入jstl与taglibs两个库
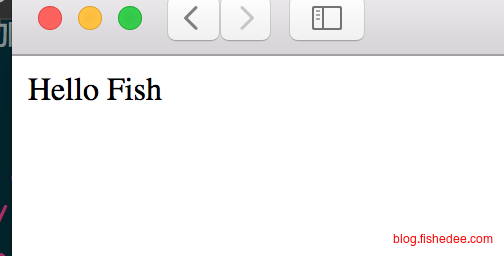
启动后就能看到带参数的视图了
6.3 输入
@Controller
public class HomeController {

    @RequestMapping(value="/",method= RequestMethod.GET)
    public String home(
            @RequestParam("page") int page,
            @RequestParam(value="page2",defaultValue = "mmc") String page2,
            Model model){
        model.addAttribute("text","Hello Fish "+ page+","+page2);
        return "home";
    }
}
控制器中处理Query的参数,用RequestParam就可以了
@Controller
public class HomeController {

    @RequestMapping(value="/{spittleId}",method= RequestMethod.GET)
    public String home(
            @PathVariable("spittleId") int spittleId,
            Model model){
        model.addAttribute("text","Hello Fish "+ spittleId);
        return "home";
    }
}
控制器中处理Path的参数,用PathVariable就可以了
6.4 表单
<%@ taglib uri="http://java.sun.com/jsp/jstl/core" prefix="c" %>
<%@ page contentType="text/html;charset=UTF-8" language="java" %>
<html>
  <head>
    <title>Spring MVC</title>
  </head>
  <body>
    <form method="post">
      FirstName: <input type="text" name="firstName"/><br/>
      LastName: <input type="text" name="lastName"/><br/>
      <input type="submit" value="提交"/>
      </form>
  </body>
</html>
提交的表单
@Controller
public class HomeController {

    @RequestMapping(value="/",method= RequestMethod.GET)
    public String home(){
        return "home";
    }

    @RequestMapping(value="/",method= RequestMethod.POST)
    public String submit(
            User user){
        System.out.println(user.getFirstName()+","+user.getLastName());
        return "home";
    }
}
添加控制器,将表单参数写入到来自一个实体对象
/**
 * Created by fishedee on 15/12/2016.
 */
public class User {

    private String firstName;

    public void setFirstName(String firstName) {
        this.firstName = firstName;
    }

    public String getFirstName() {
        return firstName;
    }

    private String lastName;

    public void setLastName(String lastName) {
        this.lastName = lastName;
    }

    public String getLastName() {
        return lastName;
    }

}
建立User对象即可
6.5 异常
@Controller
public class HomeController {

    @RequestMapping(value="/",method= RequestMethod.GET)
    public String home(){
        throw new MyException();
        //return "home";
    }

}
在Controller上抛出指定的异常
package com.fishedee;

import org.springframework.http.HttpStatus;
import org.springframework.web.bind.annotation.ResponseStatus;

/**
 * Created by fishedee on 15/12/2016.
 */
@ResponseStatus(value= HttpStatus.NOT_FOUND,reason = "找不到呀")
public class MyException extends RuntimeException {

}
如果异常上有ResponseStatus的标志,那么mvc的返回码就会按照注解上的显示
@Controller
public class HomeController {

    @RequestMapping(value="/",method= RequestMethod.GET)
    public String home(){
        throw new RuntimeException("mm");
        //return "home";
    }

    @ExceptionHandler(Exception.class)
    public String handleException(Model model){
        model.addAttribute("text","这里是异常呀");
        return "home";
    }
}
通过在Controller类方法上增加ExceptionHandler来捕捉通用异常,并用特定的view来渲染错误
@ControllerAdvice
public class MyHandler {

    @ExceptionHandler(Exception.class)
    public String handleException(Model model){
        model.addAttribute("text","这里是异常呀2");
        return "home";
    }
}
新增ControllerAdvice捕捉所有Controller的异常
7 MVC的View
7.1 通用视图解析器
package com.fishedee;

import org.springframework.web.servlet.View;
import org.springframework.web.servlet.ViewResolver;

import javax.servlet.http.HttpServletRequest;
import javax.servlet.http.HttpServletResponse;
import java.io.OutputStream;
import java.util.Locale;
import java.util.Map;

/**
 * Created by fishedee on 15/12/2016.
 */
public class MyViewResolver implements ViewResolver{
    @Override
    public View resolveViewName(String var1, Locale var2) throws Exception{
        return new MyView();
    }
}

class MyView implements View{
    @Override
    public String getContentType(){
        return "text/html;charset=utf-8";
    }

    @Override
    public void render(Map<String,?> model, HttpServletRequest request, HttpServletResponse response)throws Exception{
        OutputStream outputStream = response.getOutputStream();
        String data = "<!doctype><html><head></head><body>jj</body></html>";
        response.addHeader("Content-Type","text/html;charset=utf-8");
        outputStream.write(data.getBytes("UTF-8"));
    }
}
定义属于自己的ViewResolver,相当的简单
/**
 * Created by fishedee on 29/11/2016.
 */
@Configuration
@EnableWebMvc
@ComponentScan
public class WebConfig extends WebMvcConfigurerAdapter {
    @Bean
    public ViewResolver viewResolver(){
        return new MyViewResolver();
    }

    @Override
    public void configureDefaultServletHandling(DefaultServletHandlerConfigurer configurer){
        configurer.enable();
    }
}
然后在WebConfig中将ViewResolver指向到自己的MyViewResolver即可
7.2 Thymeleaf解析器
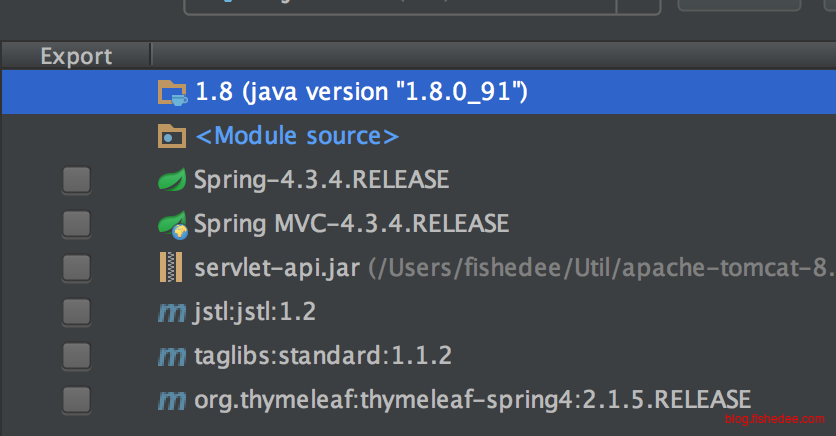
加入thymeleaf的依赖
package com.fishedee;

import org.springframework.context.annotation.Bean;
import org.springframework.context.annotation.ComponentScan;
import org.springframework.context.annotation.Configuration;
import org.springframework.web.servlet.ViewResolver;
import org.springframework.web.servlet.config.annotation.DefaultServletHandlerConfigurer;
import org.springframework.web.servlet.config.annotation.EnableWebMvc;
import org.springframework.web.servlet.config.annotation.WebMvcConfigurerAdapter;
import org.thymeleaf.spring4.SpringTemplateEngine;
import org.thymeleaf.spring4.view.ThymeleafViewResolver;
import org.thymeleaf.templateresolver.ServletContextTemplateResolver;
import org.thymeleaf.templateresolver.TemplateResolver;

/**
 * Created by fishedee on 29/11/2016.
 */
@Configuration
@EnableWebMvc
@ComponentScan
public class WebConfig extends WebMvcConfigurerAdapter {
    @Bean
    public ViewResolver viewResolver(SpringTemplateEngine engine){
        ThymeleafViewResolver viewResolver = new ThymeleafViewResolver();
        viewResolver.setTemplateEngine(engine);
        return viewResolver;
    }

    @Bean
    public SpringTemplateEngine templateEngine(TemplateResolver resolver){
        SpringTemplateEngine templateEngine = new SpringTemplateEngine();
        templateEngine.setTemplateResolver(resolver);
        return templateEngine;
    }

    @Bean
    public TemplateResolver templateResolver(){
        TemplateResolver templateResolver = new ServletContextTemplateResolver();
        templateResolver.setPrefix("/WEB-INF/views/");
        templateResolver.setSuffix(".html");
        templateResolver.setTemplateMode("HTML5");
        return templateResolver;
    }

    @Override
    public void configureDefaultServletHandling(DefaultServletHandlerConfigurer configurer){
        configurer.enable();
    }
}
将ViewResolver指向ThymeleafViewResolver
<html
    xmlns="http://www.w3.org/1999/xhtml"
    xmlns:th="http://www.thymeleaf.org">
<head>
    <meta charset="UTF-8"/>
    <title>Title</title>
</head>
<body>
    <h1>Welcome!</h1>
    <div th:text="${text}"></div>
</body>
</html>
建立一个Thymeleaf的模板,呃,明显比用标签变量的jsp要顺眼多了
8 MVC的安全
8.1 基础
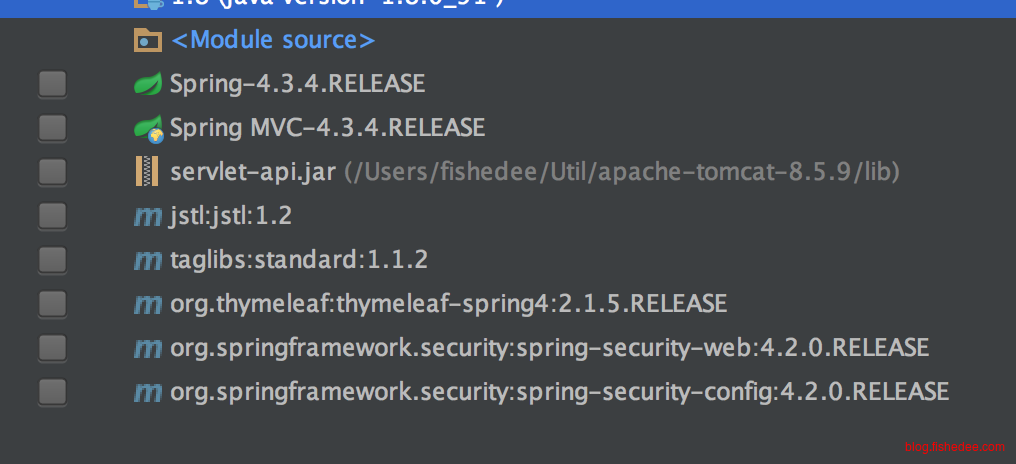
引入security-web与security-config两个依赖
package com.fishedee;

import org.springframework.core.annotation.Order;
import org.springframework.security.web.context.AbstractSecurityWebApplicationInitializer;

/**
 * Created by fishedee on 15/12/2016.
 */
public class SecurityAppInitializer extends AbstractSecurityWebApplicationInitializer{
}
建立AbstractSecurityWebApplicationInitializer类,其会增加Security的Filter
package com.fishedee;

import org.springframework.context.annotation.Configuration;
import org.springframework.security.config.annotation.authentication.builders.AuthenticationManagerBuilder;
import org.springframework.security.config.annotation.web.builders.HttpSecurity;
import org.springframework.security.config.annotation.web.configuration.EnableWebSecurity;
import org.springframework.security.config.annotation.web.configuration.WebSecurityConfigurerAdapter;

/**
 * Created by fishedee on 15/12/2016.
 */

@Configuration
@EnableWebSecurity
public class SecurityConfig extends WebSecurityConfigurerAdapter{

    @Override
    protected void configure(HttpSecurity http) throws Exception {
        http.authorizeRequests().anyRequest().denyAll();
        http.csrf().disable();
    }
}
建立SecurityConfig,建立安全配置,默认为禁止所有的请求访问
/**
 * Created by fishedee on 29/11/2016.
 */
public class WebAppInitializer extends AbstractAnnotationConfigDispatcherServletInitializer {
    @Override
    protected String[] getServletMappings(){
        System.out.println("uu");
        return new String[]{"/"};
    }

    @Override
    protected Class<?>[] getRootConfigClasses(){
        return new Class<?>[]{RootConfig.class,SecurityConfig.class};
    }

    @Override
    protected Class<?>[] getServletConfigClasses(){
        return new Class<?>[]{WebConfig.class};
    }
}
在WebAppInitializer中将SecurityConfig.class加入到RootConfig中
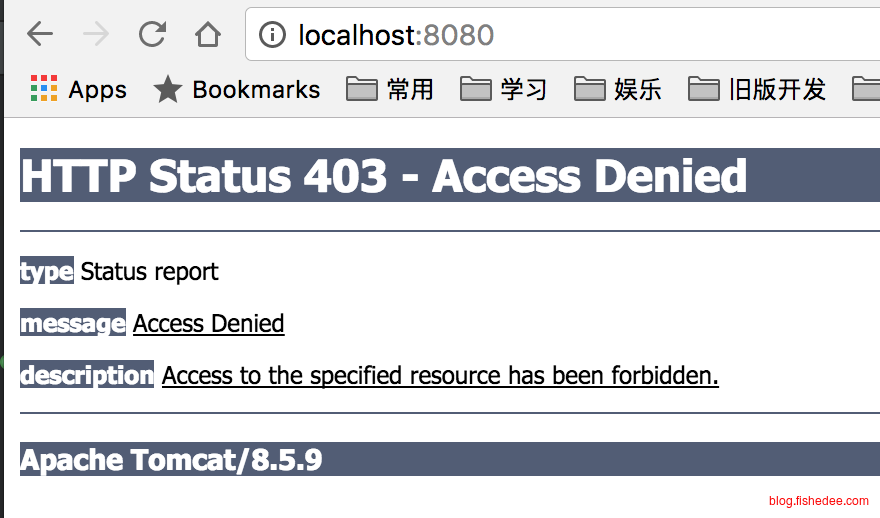
这时候无论打开什么请求都会返回403返回了
8.2 身份认证
@Configuration
@EnableWebSecurity
public class SecurityConfig extends WebSecurityConfigurerAdapter{

    @Override
    protected void configure(AuthenticationManagerBuilder auth)throws Exception{
        auth.inMemoryAuthentication()
                .withUser("fish").password("123").roles("USER","ADMIN").and()
                .withUser("fish2").password("456").roles("USER");
    }

    @Override
    protected void configure(HttpSecurity http) throws Exception {
        http.authorizeRequests().
                anyRequest().authenticated().and().formLogin();
        http.csrf().disable();
    }
}
配置为所有请求都必须登录后才能访问
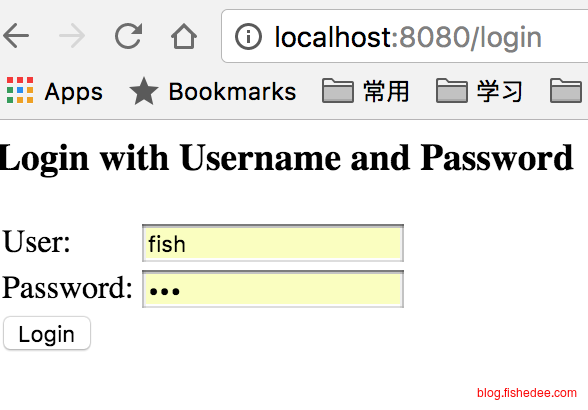
这时候请求所有请求都会跳转到固定的/login页面,登录后自动跳转到原有的请求页面,注意,security指定的登出为/logout
8.3 获取用户
@Controller
public class HomeController {

    @RequestMapping(value="/",method= RequestMethod.GET)
    public String home(Model model){
        model.addAttribute("text","My Name is Fish");
        UserDetails userDetails = (UserDetails) SecurityContextHolder.getContext()
                .getAuthentication()
                .getPrincipal();
        System.out.println(userDetails);
        return "home";
    }

}
在Controller层通过SecurityContextHolder.getContext获取当前用户的信息
9 数据库
9.1 数据源

引入mysql-connector-java的库
/**
 * Created by fishedee on 29/11/2016.
 */
@Configuration
@EnableWebMvc
public class RootConfig {
    @Bean
    public DataSource dataSource(){
        DriverManagerDataSource ds = new DriverManagerDataSource();
        ds.setDriverClassName("com.mysql.jdbc.Driver");
        ds.setUrl("jdbc:mysql://localhost:3306/test");
        ds.setUsername("root");
        ds.setPassword("1");
        return ds;
    }
}
RootConfig 中加入DataSource的配置,这里使用的是Spring的jdbc连接控制器
9.2 jdbc模板
/**
 * Created by fishedee on 29/11/2016.
 */
@Configuration
@EnableWebMvc
public class RootConfig {
    @Bean
    public DataSource dataSource(){
        DriverManagerDataSource ds = new DriverManagerDataSource();
        ds.setDriverClassName("com.mysql.jdbc.Driver");
        ds.setUrl("jdbc:mysql://localhost:3306/test");
        ds.setUsername("root");
        ds.setPassword("1");
        return ds;
    }

    @Bean
    public JdbcOperations jdbcTemplate(DataSource ds){
        return new JdbcTemplate(ds);
    }
}
RootConfig中加入jdbcTemplate
@Repository
public class UserRepositoryImpl implements UserRepository{
    @Autowired
    private JdbcOperations jdbcOperations;

    public List<User> findAll(){
        return jdbcOperations.query("select * from t_user", new RowMapper<User>() {
            @Override
            public User mapRow(ResultSet resultSet, int i) throws SQLException {
                return new User(
                        resultSet.getInt("userId"),
                        resultSet.getString("name"),
                        resultSet.getString("email")
                );
            }
        });
    }
}
在UserRepositoryImpl中使用jdbcOperations来获取数据,简单暴力
/**
 * Created by fishedee on 16/12/2016.
 */
public interface UserRepository {
    List<User> findAll();
}
简单的UserRepository接口
package com.fishedee;

/**
 * Created by fishedee on 16/12/2016.
 */
public class User {

    public User(){

    }

    public User(int userId,String name,String mail){
        this.userId = userId;
        this.name = name;
        this.mail = mail;
    }

    private int userId;

    public int getUserId(){
        return this.userId;
    }

    public void setUserId(int userId){
        this.userId = userId;
    }

    private String name;

    public String getName(){
        return this.name;
    }

    public void setName(String name){
        this.name = name;
    }

    private String mail;

    public String getMail(){
        return this.mail;
    }

    public void setMail(String mail){
        this.mail = mail;
    }

}
无聊的User类
@Controller
public class HomeController {

    @Autowired
    private UserRepository userRepository;

    @RequestMapping(value="/",method= RequestMethod.GET)
    public String home(){
        List<User> users = userRepository.findAll();
        for( User user : users ){
            System.out.println(user.getName()+","+user.getMail());
        }
        return "home";
    }

}
在HomeController中引入UserRepository,然后直接使用就可以了
10 缓存
10.1 缓存源
@Configuration
@EnableWebMvc
@EnableCaching
public class RootConfig {
    @Bean
    public CacheManager cacheManager(){
        return new ConcurrentMapCacheManager();
    }

    @Bean
    public DataSource dataSource(){
        DriverManagerDataSource ds = new DriverManagerDataSource();
        ds.setDriverClassName("com.mysql.jdbc.Driver");
        ds.setUrl("jdbc:mysql://localhost:3306/test");
        ds.setUsername("root");
        ds.setPassword("1");
        return ds;
    }

    @Bean
    public JdbcOperations jdbcTemplate(DataSource ds){
        return new JdbcTemplate(ds);
    }
}
配置好CacheManager的bean,并且设置好EnableCaching的注解即可
10.2 方法注解
@Repository
public class UserRepositoryImpl implements UserRepository{
    @Autowired
    private JdbcOperations jdbcOperations;

    public List<User> findAll(){
        return jdbcOperations.query("select * from t_user", new RowMapper<User>() {
            @Override
            public User mapRow(ResultSet resultSet, int i) throws SQLException {
                return new User(
                        resultSet.getInt("userId"),
                        resultSet.getString("name"),
                        resultSet.getString("email")
                );
            }
        });
    }

    @Cacheable(value="mycache",key="#id")
    public User get(int id){
        System.out.println("repository get");
        return jdbcOperations.queryForObject("select * from t_user where userId = ?", new RowMapper<User>() {
            @Override
            public User mapRow(ResultSet resultSet, int i) throws SQLException {
                return new User(
                        resultSet.getInt("userId"),
                        resultSet.getString("name"),
                        resultSet.getString("email")
                );
            }
        },id);
    }

    @CacheEvict(key="#id",value="mycache")
    public void del(int id){
        System.out.println("repository del");
        jdbcOperations.update("delete from t_user where userId = ?",id);
    }

    @CachePut(key="#result.userId",value="mycache")
    public User add(final User user){
        System.out.println("repository add");
        KeyHolder keyHolder = new GeneratedKeyHolder();
        jdbcOperations.update(new PreparedStatementCreator(){
            public PreparedStatement createPreparedStatement(Connection conn)
                    throws SQLException {
                PreparedStatement ps = conn.prepareStatement("insert into t_user(name,email)value(?,?)", Statement.RETURN_GENERATED_KEYS) ;
                ps.setString(1,user.getName());
                ps.setString(2,user.getMail());
                return ps ;
            }
        },keyHolder);

        user.setUserId(keyHolder.getKey().intValue());
        return user;
    }
}
UserRepositoryImpl在方法中加入Cacheable注解(方法调用缓存),CacheEvict注解(方法调用完毕后删除缓存),CachePut注解(方法调用完毕后增加缓存),注意缓存的key必须为同一个数据类型
@Controller
public class HomeController {

    @Autowired
    private UserRepository userRepository;

    @RequestMapping(value="/",method= RequestMethod.GET)
    public String home(){
        System.out.println("begin");
        userRepository.get(1);
        userRepository.get(1);
        System.out.println("get finish");
        User newUser = userRepository.add(new User(0,"mm3","mm3@qq.com"));
        userRepository.get(newUser.getUserId());
        System.out.println("add finish");
        userRepository.del(1);
        userRepository.get(1);
        System.out.println("del finish");
        return "home";
    }

}
在HomeController中测试缓存的使用
begin
repository get
get finish
repository add
add finish
repository del
repository get
注意到了第二次get被缓存了,同时add以后也会走缓存了,而del以后也会强制走缓存了
11 消息
11.1 消息源
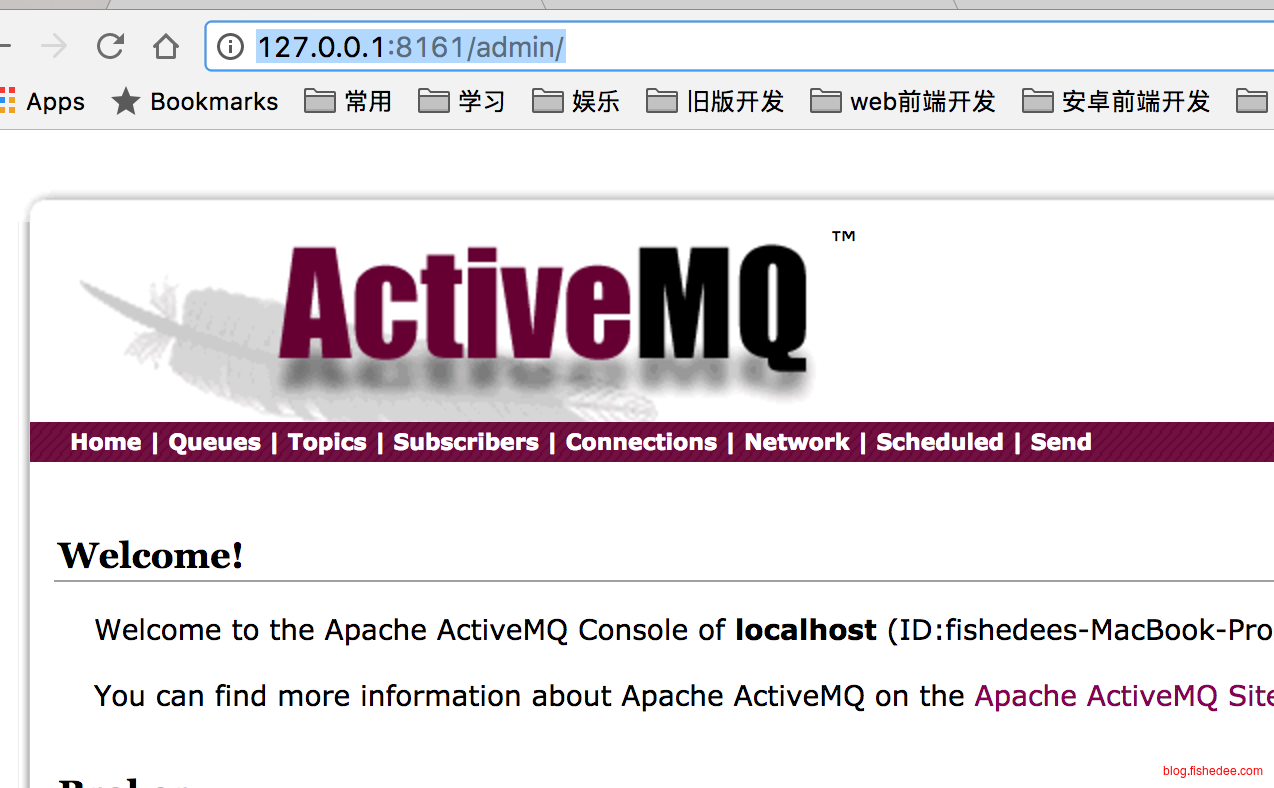
安装activemq,注意用bin/macos下的activemq来启动,能进入到管理员页面才算成功

引入activemq-spring的包,以及jackjson的三个包
package com.fishedee;

import org.apache.activemq.ActiveMQConnectionFactory;
import org.springframework.cache.annotation.EnableCaching;
import org.springframework.context.annotation.Bean;
import org.springframework.context.annotation.ComponentScan;
import org.springframework.context.annotation.Configuration;
import org.springframework.jms.annotation.EnableJms;
import org.springframework.jms.config.DefaultJmsListenerContainerFactory;
import org.springframework.jms.core.JmsTemplate;
import org.springframework.jms.support.converter.MappingJackson2MessageConverter;
import org.springframework.jms.support.converter.MarshallingMessageConverter;
import org.springframework.jms.support.converter.MessageConverter;
import org.springframework.web.servlet.config.annotation.EnableWebMvc;

import javax.jms.ConnectionFactory;


/**
 * Created by fishedee on 29/11/2016.
 */
@Configuration
@EnableWebMvc
@EnableJms
@ComponentScan
public class RootConfig {
    @Bean
    public ConnectionFactory connectionFactory(){
        ActiveMQConnectionFactory connectionFactory = new ActiveMQConnectionFactory();
        connectionFactory.setBrokerURL("tcp://localhost:61616");
        return connectionFactory;
    }

    @Bean
    public MessageConverter messageConverter(){
        MappingJackson2MessageConverter converter = new MappingJackson2MessageConverter();
        converter.setTypeIdPropertyName("_type");
        return converter;
    }

    @Bean
    public JmsTemplate jmsTemplate(ConnectionFactory factory,MessageConverter messageConverter){
        JmsTemplate template = new JmsTemplate();
        template.setConnectionFactory(factory);
        template.setMessageConverter(messageConverter);
        return template;
    }

    @Bean
    public DefaultJmsListenerContainerFactory jmsListenerContainerFactory(ConnectionFactory factory2,MessageConverter messageConverter) {
        DefaultJmsListenerContainerFactory factory = new DefaultJmsListenerContainerFactory();
        factory.setConnectionFactory(factory2);
        factory.setMessageConverter(messageConverter);
        factory.setConcurrency("1-1");
        return factory;
    }
}
在RootConfig中配置ConnectionFactory,JmsTemplate和DefaultJmsListenerContainerFactory,分别代表连接池,发送模板,接收池,最后,注意打开EnableJms注解,还有就是jackjson要配置TypeIdPropertyName
11.2 发布消息
@Controller
public class HomeController {

    @Autowired
    JmsTemplate jmsTemplate;

    @RequestMapping(value="/",method= RequestMethod.GET)
    public String home(){
        jmsTemplate.convertAndSend("myqueue",new User(1001,"fish","fish2"));
        return "home";
    }

}
直接用convertAndSend发送消息,简单暴力
11.3 接收消息
@Component
public class MessageReceiver {
    @JmsListener(destination = "myqueue")
    public void receiveMessage(final User user) {
        System.out.println(user);
    }
}
使用JmsListener注解来接收消息,依然也是简单暴力
12 总结
Spring的IOP与AOP,配合Java中的注解,开发后台相当的轻松简单,唯一不爽的地方是
- 引入外部依赖库因为墙的缘故很慢
- 配置太过麻烦,每次都要调好久
- 与Servlet的耦合太紧密了,不能独自启动后台
总体来说,整个设计还是非常值得参考的
- 本文作者: fishedee
- 版权声明: 本博客所有文章均采用 CC BY-NC-SA 3.0 CN 许可协议,转载必须注明出处!